Exaile Vs. Amarok  


Exaile is a free software audio player for Unix-like operating systems that aims to be similar to KDE's Amarok, but based on the GTK+ toolkit instead of the Qt toolkit Amarok uses.

First of all, I compared these two players, cause Exaile developers state that

"Exaile is a music player aiming to be similar to KDE's Amarok, but for GTK+ and written in Python."

or in other words, as Amarok is for KDE, Exaile is the same for GNOME. So, Exaile incorporates lot of the features found in Amarok, such as: fetching of album art (images are taken from Amazon) , easy handling of large music libraries, fetching of lyrics, getting artist and album information via Wikipedia, integration with last.fm, playlists, etc...

pic 1: Exaile in it's minimal possible dimensions, and Amarok in player mode

Exaile uses the GStreamer engine for playback, whereas Amarok uses XINE. There is a large list of plugins available in Exaile:

- Alarm Clock
Plays music at a specific time.
Note that when the specified time arrives, Exaile will just act like you pressed the play button, so be sure you have the music you want to hear in your playlist.

- AWN
Displays the current album's cover art, progress and/or remaining time in AWN.

- Music Sharing
Allows playing of DAAP music shares.
Depends: python-daap, python-avahi.

- Desktop Cover
Displays the current album cover on the desktop.

- Did You Know
Displays a 'did you know..' information from Wikipedia.
Press the 'i' icon the show the popup window. Double click on popup window to hide it.

- LibNotify
Uses libnotify to inform you when a new song starts.

- Global Hotkeys
Enables support for Global Hotkeys in metacity (default gnome window manager).

- iPod Device Driver
iPod Driver for the Devices Panel.

- Mass Storage Driver
Mass Storage Driver for the Devices Panel.

- No Taskbar Entry
Removes exaile from the taskbar.

- Resume Playback
Resumes playback after restarting exaile.

- Serpentine Plugin
Opens the songs in the current playlist for burning in.

- Shoutcast Radio
Allows you to browse the Shoutcast Streaming Radio network.

- Sound Juicer
Allows importing of cds with sound-juicer.

- Streamripper!
Allows you to record streams with streamripper.
Requires the command line version of streamripper to be installed.

- Update Notifier
Notifies the user of Exaile and plugin updates.

From all of these plugins, I only use streamripper (I listen to di.fm frequently, and the plugin does the job as It's supposed to), but It's a nice pugin list indeed. Only one thing really annoys me. The look and feel. Even Banshee (featured in openSUSE and written in MONO) has better look and feel (great look and feel infact) but cannot handle large libraries easily. And another thing is that It has set minimal height and width so it cannot be made smaller than some fixed dimension, and that is a bad thing. And the final con, the minimal mode if far worse than the player mode in Amarok.

To sum up, Exaile is a great player, but if It wants to dominate the GNOME desktop (like Amarok dominates the KDE deskop) a lots of work should be done, cause with competitors like Banshee, it isn't easy.

Read More...
AddThis Social Bookmark Button

HOWTO: install openSUSE 10.3  

Let's install openSUSE. It's a great distro, with big community, and a lot of support and on-line documentation. First lets download it, go to software.opensuse.org, I'll download and install Live CD KDE.

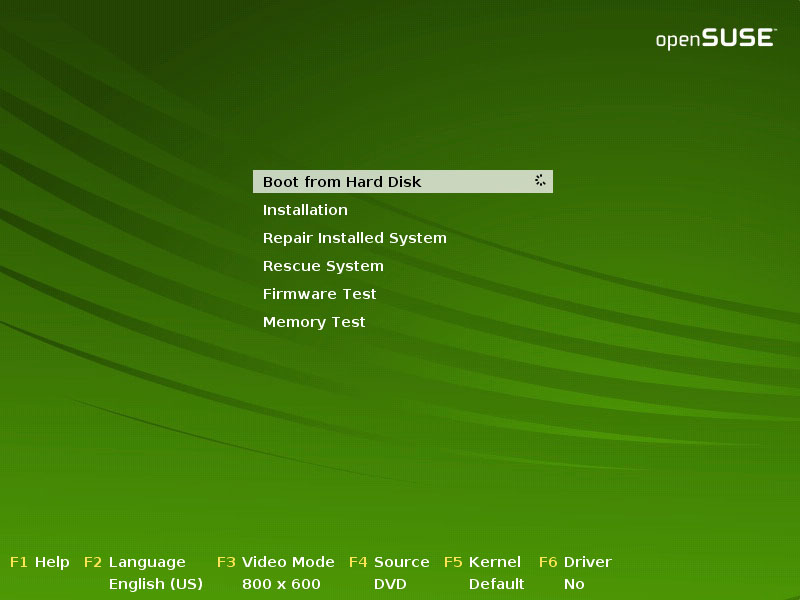
Now, burn the image to disk and reboot the PC with the disk inserted in it. It is very important to select properly the boot sequence in your BIOS. If the HDD if placed first in the sequence the CD/DVD-ROM will never boot the CD. If the boot sequence is properly set, you should get the following screen:


Select Installation and continue. In the next screen select the desired language, and click Next. Then, in the next window accept the license agreement and click Next.


What you will do here depends on a few things. Under Select Mode, choose New Installation. If you are installing openSUSE from your DVD, or an openSUSE retail boxed edition, then you can deselect Add Online Repositories Before Installation. In addition, if you have no wired Internet connection available at your computer, you will be unable to add these repositories and must deselect the option. However, we are installing openSUSE from a single CD and have a working Internet connection, so we'll keep the option selected and click Next.Click Next. The next screen has options that an advanced user may wish to change, but you can simply click Next. In this screen, you are able to select different repositories, or catalogs of software for your computer. The default selected includes all open source and proprietary software. Click Next and wait for the software catalog to build.

Select your region of the world in the left, and then your time zone in the right. Below the time zones, ensure that YaST is displaying the correct time and date. If not, click Change and adjust the time. After few Next clicks You'll get to the screen where it asks about Partitioning, where is how your computer is going to look after the installation is complete. If, for example, you have a Windows system installed currently, YaST will resize Windows to make enough room for openSUSE, but Windows will remain on your computer. Software are the applications YaST will install on your computer. Language lists what language packs YaST will install, and what will be the default language in the installed openSUSE system.

Read over the list and if you would like to change an option, click the title of the section. Consult the help text in YaST and in the Documentation for what to do in these screens.
If you're ready, click Accept.

Finally, the installation will begin. You can wait until the installation is complete.


Now that the installation has finished properly, and that the system has rebooted, you will set up a password for your Administrator account (root). Be sure to make the password easy to remember, but hard to guess. Repeat the password, then click Next.

On the next screen you can set up your host name. If you are not a part of a network, or you do not know what you should enter here, simply accept the defaults. Make any changes you wish, then click Next. In the next screen you will setup your network configuration. In most cases, you should click Next. If you notice any issues, you can change the option by clicking on the title of the option. Few Next clicks and screens go next, and the Users setup screen appears.


In the User's Full Name field, enter your full name. In Username, type a username. Usernames must be all lowercase. The enter your password and repeat it. It's recommended you deselect Autologin for security reasons. In the next screen YaST will write the configuration of your system to a file. You can simply wait for it to finish. The release notes are in the next screen, and here information about the setup and changes of the openSUSE system is displayed.

The next screen is the Hardware Setup screen, here YaST will auto-detect and auto-configure most hardware, and the hardware YaST has detected on your computer will appear here. If you see anything that is incorrect, or that you would like to change, select the title of that option. If not, click Next.

Sooooo, in the next screen you are finished setting up your openSUSE computer, and you can now log in to openSUSE. So simply click Finish.

Installation is now complete. Have a lot of fun!

images and tutorial taken, simplified and reinterpreted from openSUSE
http://en.opensuse.org/INSTALL_Local

Read More...
AddThis Social Bookmark Button

HOWTO: try LIVE CD in VirtualBox  


Isn't it nice to try the Live CD from any Linux Distro without the need to restart the computer, isn't it? It can be done using a 'virtual pc' program. First of all, why would you use such a program. The point is, before you install a Linux distro, try it, and it doest suits you, don't install it later. I'm going to show you how, using VirtualBox. To introduce you quickly to this application, I'll quote wikiperdia:

Compared with the other established commercial virtualization software such as VMware Workstation and Microsoft Virtual PC, VirtualBox lacks some features, but in turn provides others. Such unique features are running virtual machines remotely over the Remote Desktop Protocol (RDP), iSCSI support and USB support with remote devices over RDP.


Now, how to install it, and get it running. There are two variants of the application. One under a proprietary license, which is good if you want to make commercial use of it, and another called the VirtualBox Open Source Edition (OSE) released under the GPL.

I'll assume that you know how to install the packages in your distro. If you know, find the package using the search keyword "virtualbox" and install it.

Now, let's get running. The first screen looks like this:

pic 1: My desktop running VirtualBox

Step 1: click New. New window form will show up, click Next there. Under name type whatever you like e.g. LiveCD. Under OS Type select Linux 2.6. That means It will be capable of running every Linux with kernel version 2.6.X.

Step 2: click Next again. Here you decide how much memory to be dedicated to the LiveCD session. Select not less than 256mb, my recommendation. Click Next.

Step 3: here you can make a virtual Hard Disk, if you wish to install it, so you will be able to use it extensively, not only in LiveCD mode, but we don't want that for now, so click Next, and continue on.

Step 4: click Finish. Now locate on the tab details. Click on the label "CD/DVD ROM". Tick "mount cd/dvd drive". Select "iso image file" and locate the CD image you have previously downloaded. Click OK.

Step 5: click Start and have fun!

Read More...
AddThis Social Bookmark Button

A quick introductory...  

First of all, let me inroduce myself, I'm Martin, living and breathing in Macedonia. My goal and biggest hope is that everything what you read here will be at least a little helpful...

...what you can expect is news and howtos ;)

...as a daily Linux user, now I'm going to make my top 5 distro chart, and explain why:

1. Mandriva - 2008.0 - because it's friendly, stable, and out-of-the-box
2. openSUSE - 10.3 - same as Mandriva, but it lacks drivers and codecs and it has slow installation of packages
3. Debian - 4 - because it's rock solid stable, but a lot of packages have to be installed aditionaly
4. Linux Mint - 4 - because it's based on Ubuntu, which is based on Debian, plus it has codecs and Java
5. Parsix - 1 - I've tried it few days ago, and it's really nice, plus it's based on Debian

I'll be writing soon again... cheers...

Read More...
AddThis Social Bookmark Button